An anode rod can be an important part of your hot water system. It can help prevent your system from smelling like rotten eggs, turning your water brown, or even worse, flooding your basement. With over 20 years of handyman experience and owning multiple rental properties, I’m here to guide you through a step-by-step process on how to change your own anode rod. If you’re not confident about using a wrench, you can always hire a handyman or plumber for about $50-$150.
What is an Anode Rod?
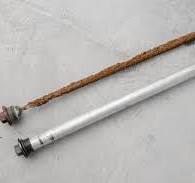
An anode rod is a long rod, typically made of aluminum, magnesium, zinc, or a combination of these materials. It is inserted into the hot water tank to protect the tank’s metal liner from rust.
When Should I Change the Anode Rod?
You should inspect your anode rod every 3-5 years or sooner if you have hard water. Change it if you notice that the rod has deteriorated significantly, if you see rust-colored water from your tap, or if there is a smell from the water.
Which type of anode rod do I buy?
There are two main types of anode rods: hex plug type and nipple type.
- The hex plug type will be under a plastic cap on top of the hot water tank. Sometimes it is marked “anode rod” and sometimes it is not. In some cases, you might have to dig out the expansion foam to access the anode rod bolt.
- The nipple type will be under the hot water outlet pipe that is hooked up to your hot water supply. You will have to remove the hot water supply union and unscrew the pipe water nipple.
Which anode rod type (material) do I buy?
There are two main metals to buy: magnesium or aluminum/zinc.
- The magnesium anode rod is good for your average water system.
- The aluminum/zinc is made more for your harder water and eliminates your rotten egg smell.
In my area, where hard water is common, I often opt for aluminum/zinc rods to prevent the smell, especially when the homeowners go on vacations.
Step-by-Step Guide to Changing Your Hot Water Anode Rod
Tools You Will Need:
- Garden Hose
- New anode rod (either hex bolt style or nipple type style)
- Ratchet and extension
- 1 1/16 inch deep socket (if hex style type)
- Flathead screwdriver
- Pipe for leverage
- Teflon tape
- Crescent wrench and pipe wrench (if niple-style type)
How to:
- Turn off water supply to both hot and cold water lines.
- Shut off gas or electrical supply to the hot water supply. If gas, find the shut-off valve. If it’s electric, turn off the breaker.
- Drain the tank by hooking up a garden hose to the drain valve.
- Turn the drain valve screw counterclockwise with a flathead screwdriver. Be careful not to turn it too much-just a ¼ to ½ turn. If too far, it may shut off. You can tell when it starts to drain by listening for the water flow.
- Open the relief valve to make the water run faster, but be cautious of the hot water!
- Drain the tank fully or just enough to remove the anode rod. I recommend draining the entire tank, as you should be flushing it every year anyway.
- Remove the old anode rod.
- Hex bolt style: Remove the cap and, if necessary, remove the expansion foam. Then, use a 1 1/16 inch deep socket to remove the anode rod.
- Nipple style: Use a crescent wrench to remove the hot water outlet line, then use a pipe wrench to remove the anode rod.
- Install new anode rod. Don’t forget to add Teflon tape around the threads of the anode rod.
- Check for leaks to ensure that everything is sealed properly.
Conclusion:
Many people neglect their hot water systems. It’s often only when something goes wrong that homeowners take action. But your hot water system can degrade quietly over time. I encourage you to check your system regularly. Just like you wouldn’t skip an oil change for your car or skip a blood pressure check, regular maintenance on your hot water system can prevent unexpected problems and costly repairs.

Leave a comment